If you have a rifle and you don’t know how to mount a scope properly, then you are at the right place. This article will lead you through all of the procedures required to correctly mount a rifle scope.
Learning how to set up your own rifle scope might make the difference between hitting and missing that once-in-a-lifetime shot. I was afraid of mounting my own rifle scopes some time ago. It was so terrible that I always doubted if my scope mount would hit its target when it mattered the most. Now, I can properly mount a scope and can boldly publish a simple tutorial that anybody could follow.
Why Should You Do A Scope Mount Yourself?
Why should I bother mounting my own scope, when I could either spend a few dollars to have the folks at my gun shop fix it, or even get it done free there.
The basic explanation is that your scope was most likely poorly mounted by someone else, so you have to do it yourself to be sure it is properly done. Many gun experts believe that the most important thing you can do to increase your rifle’s performance is to correctly mount your own rifle scope. Most of the guys at gun stores can install rifle scopes, but most of the rifle scopes are not mounted with precision, which can cause a variety of issues when shooting.
Consider the following: A person who is mounting a scope on someone else’s rifle and dealing with other clients at the same time is prone to making mistakes or hurrying things. It’s just human nature. If your rifle does not fire the way you believe it should, then it is likely that your scope was not properly mounted.
Most rifles have either been pre-drilled and tapped for the scope base or grooved for the correct mounting attachments, so you must ensure that the mounting system you choose is a good fit for your rifle and the rings are the correct height and diameter for positioning your scope. Some mounting rings will only fit a certain scope base, so ensure that they match. Scope mounting rings come in different sizes and heights.
While there are several other ways to do a rifle scope mount, this method will work on almost any rifle. Follow these steps on how to mount a rifle scope for accurate long range shooting.
STEPS TO MOUNTING A SCOPE:
- Gather Your Tools.
- Choose the right base and rights.
- Mount/Install the Base on Your Rifle.
- Attach the Scope Rings to the Base.
- Adjust the Scope Position way you want.
- Level your rifle scope.
- Safeguard the scope inside the rings.
Let’s go into details on the steps to mounting a scope on a rifle.
STEP 1: GATHER YOUR TOOLS
Before embarking on any project, it is important that you get the right tools for the job. Let’s have a look at some of the things you need to successfully mount a scope on a rifle. We’ll also include several items that aren’t strictly necessary but are suggested since they either make scope mounting easier or help you get the job done faster. If you intend to work on firearms, start collecting these essential tools as soon as your budget permits
Tools Recommended for Scope Mounting
If you already have hex keys, as well as wrenches/sockets, you should be able to mount a scope. However, in order to accomplish this task correctly, we recommend that you use some of the tools listed below. Furthermore, if you want to use as many rifle scopes throughout your lifetime, these tools would come in handy.
- Gun Vise
- Laser Bore Sighter
- Arisaka Optic Leveler
- Vortex Optics Torque Wrench
- Loctite Heavy Duty Threadlocker
STEP 2: CHOOSE THE RIGHT BASE AND RINGS
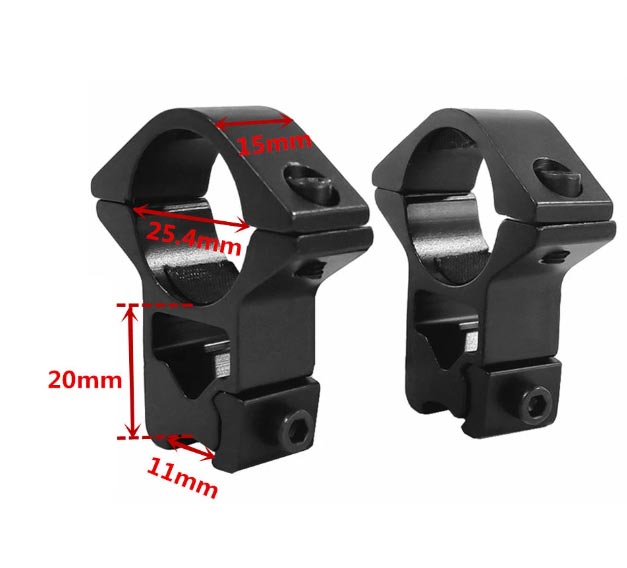
When mounting a scope on a rifle, two things are usually required: scope rings and a rifle base. Some rifles have a base (for example, a Picatinny rail or Pic rail on an AR15), but many don’t. If your rifle does not have the Picatinny rail, then you’ll have to find the correct base and make sure it fits your weapon. Once you get the base, you’ll need to locate the appropriate rings to match your specific scope, attach the scope to your selected base, and have the appropriate height or elevation so that your scope will fit without being too high. As you may imagine, manually locating the perfect rings or base can be exceedingly difficult, time-consuming, and uncomfortable.
Note: Picatinny rail or Pic rail mount is used to mount scopes on the receivers of larger caliber rifles.
STEP 3: MOUNT/INSTALL THE BASE ON YOUR RIFLE
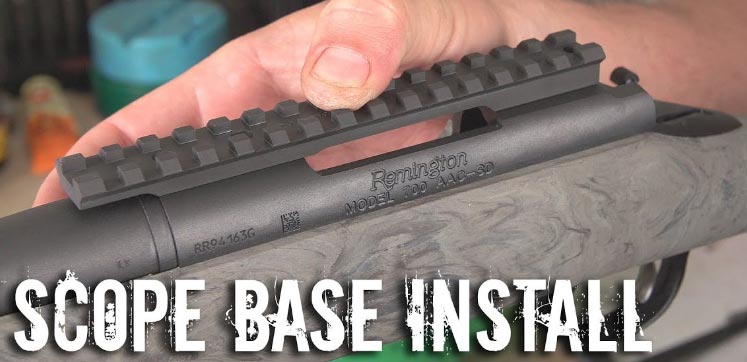
If you’re using a separate base (rather than an inbuilt base that came with your rifle e.g a Picatinny rail), you’ll need to attach it to the receiver. If you’re using an integral base, you can skip this step and go to Step 4.
Surface Preparation: To begin, mount your rifle on a gun vice, then you have to make sure the base has a clean bottom and the receiver at the top is clean. You can use a gun solvent and a clean towel to wipe the surface. For rust protection, you can put a thin coat of Break Free CLP or other suitable gun oil to the base and top of the receiver.
Once the surfaces have been prepared, it is time to mount the base on your gun.
Test-fit Base: You must ensure that the base is properly oriented. To do this, tighten mounting screws on the base to ensure a perfect fit.
After you’ve established that the base fits properly, inspect the bolt to ensure that the base screws do not interfere with the bolt.
Final Installation: Remove one of the base screws and apply half a drop of blue Loctite to the screw threads, and put it back in the screw hole before you continue with each successive screw.
STEP 4: ATTACH THE SCOPE RINGS TO THE BASE
You can do a ring mount with these easy steps.
You should connect the rings to the base before you clamp them on the scope. This is done because it is the mount bases that determine the space of the rings and not the scope.
If your base has several mounting positions, start by connecting each ring to a number of positions from either end. During this mounting procedure, the ultimate location of your rings would still be altered. If you conclude that changing the location of the rings is necessary, return to this step before proceeding.
Connecting Rings to Base: To join the rings with the base, you must make use of the adjustment mechanism that is on the opposite side of the ejector. For example, I like to align the rings such that the adjustment screw-heads or nuts are on the left side. Before you tighten the rings and base, you should observe a small front-to-back movement between the base and the rings. Ensure that you push the rings forward before and during the process of tightening to ensure that they are at a forward position.
Inertia will force the rings to travel forward relative to the rifle when you fire and having them already at their forward position would reduce the probability of it moving once attached. You would not need to torque the rings down at this stage; simply finger tighten them for the time being, as the rings may need to be moved in the next stage.
Put the Scope in the Rings: Next step is to insert the scope tube into one of the ring halves (bottom one) and then attach the other half of the ring loosely so that the scope tube would freely move between the rings. This step is necessary to prevent the scope from slipping off your weapon and landing on the floor. From experience, I know it could happen.
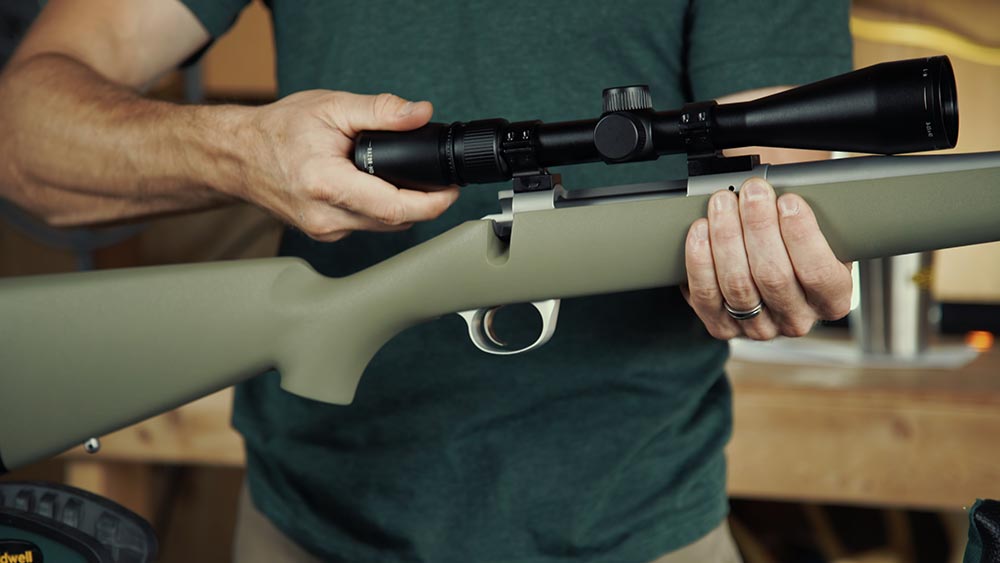
STEP 5: ADJUST THE SCOPE POSITION THE WAY YOU WANT IT
Move the scope back and forward until you have a completely clear image (without a fuzzy black ring at the edge of your view), do this while you are in a comfortable firing stance. The fuzzy view is called scope shadow; when the scope is close or too far from the eyes.
To do this correctly, get into the normal firing posture for this weapon and then lay your head upon the rifle’s stock with your eyes closed to achieve a comfortable position. After you’ve found a comfortable posture you can then open your eyes to check if your scope is properly positioned.
Most times, shooters prefer to adjust their heads to see well through the scope rather than the other way around. This frequently leads to poor shooting performance and a tired shoulder or neck. This could be an “Aha” moment for many of you when you discover you’ve been stressing your neck all the while.
Adjust the Scope: If you see anything other than full light around the scope lens, you must either move the scope back or forward, you could also move your head up or down.
A backward or forward adjustment is simple – slowly move the scope until the entire black fuzzy ring has vanished. You may discover that the location of the rings has to be modified in order to get the scope to fit properly. Don’t freak out. Move the rings to their new location, then proceed to the previous step before returning to this step to validate the position of the scope.
Tighten Rings Lightly Onto Scope: As soon as the scope is in position, gently tighten the rings around it to keep it in place. Since you just got it in the right place and do not want it to move. However, keep the rings slack enough so that you may spin the scope to level it in the following step.
STEP 6: LEVEL YOUR RIFLE SCOPE
The flat bottom of most rifle scopes can also be used for aligning the scope with the rail of the weapon.
Leveling flat-bottomed Scopes: You can use a scope leveling tool by placing the tool’s base on the rail and lining the flat bottom of the scope body to the rail with one of the tool’s wedges. You must be able to place the tool’s wedge such that the scope spins and aligns itself by having the rings loosely enough that the scope can be turned. Once the scope rings are level, tighten them with your fingers. It’s really that simple.
Unless you wish to try multiple bubble levels and devices. In that case, expect a lengthy procedure that entails doing everything several times as you assume it’s level dependent on your gadgets just to glance through the scope and find a skewed reticle.
Leveling round-bottom scopes: These are far more difficult to level. Fortunately, these scopes are uncommon.
Do not be lulled into a false sense of security by using something as simple as a plumb bob on a string. Yes, this will make the reticle in the scope align properly, but only if you are absolutely certain that your rifle is completely level before tightening the rings. It also helps eliminate the possibility of having a scope shadow
STEP 7: SECURE THE RINGS TO THE RIFLE AND SCOPE.
Rifle-Ring Tightening: Once you’re certain the rings are in the right place, you can properly tighten the rings to the base of the rifle. I prefer 65-inch pounds for heavy-duty rings. However, I wouldn’t want to go beyond 25-inch pounds for hunting-grade rings.
Tighten Scope Rings: Now that the scope is in the proper position within the rings, you can completely tighten the rings on the scope. You can do this by rotating the screws in an X pattern (just like changing a vehicle wheel) and making sure the space on each side of the rings is the same.
Note: Do not overtighten the screws
Many people get into difficulty by applying too much torque to the base screws. With certain scopes, you can truly adjust the scope’s performance. For most scopes, I prefer to apply 15-inch pounds of torque on the ring screw of the scope. You can do 20-inch pounds if the scope is heavy-duty.
Apply Thread Locker: When everything is in place, apply the thread locker to the rings. Remove the scope ring screws one at a time, as with the base, and add a half drop of blue Loctite before reinstalling the screw at the required torque.
RIFLE SIGHTING/ ZEROING SCOPE
After mounting the scope to your rifle, you must sight-in/zero the scope of your firearm. This is an excellent way to confirm you followed the instructions above correctly and to get your weapon ready for action.
There are a few phases to this procedure, and thankfully, we have a detailed tutorial on how to sight a rifle scope. It will ensure that you do it correctly and do not waste unnecessary ammunition in the process. Bore sighting can also help. To bore sight, you can use a laser bore sighter which has a red dot to test the accuracy of your rifle between 25 yards.
PREPARING YOUR RIFLE
Generally, when preparing a rifle for use, the first step is to learn how to mount a scope on your rifle. You’ll also need to zero it in, as previously mentioned. However, there is some more information on dealing with your scope and rifle that you should really look into.
SCOPE MOUNTING FAQ
What Loctite should be used on base and scope rings?
Blue Loctite can be used.
Is it possible to overtighten my scope rings?
Yes, it is possible to overtighten scope rings. A scope’s ability to work might be hampered by rings that are too tight.
What torque setting can I use while tightening the rings on my scope?
The torque on the rifle base screw should not be more than 25 in/lbs. Scope rings torque to the base should not be more than 65 in/lbs for tactical rings and 25 in/lbs for lightweight hunting rings.
Should I Lap My Rifle Scope Rings?
Lapping entails removing any variations in roundness from the interior of the rings in order to maximize contact between the scope and the rings. Lapping the rings isn’t actually essential if you’re deer hunting.

Mike Hardesty is a published freelance gun writer. He also possesses specialized expertise in rifle scopes With dozens of articles and reviews published in Pew Pew Tactical, Snipercountry.com, and TTAG (The Truth About Guns), Mike is considered a firearms expert. His special area of expertise is handguns.
Mike is a long-time shooter. He has been punching paper targets, taking deer and other game and shooting at competitions since about 1975. Other related pursuits include reloading and bullet casting. He currently reloads for over 10 calibers, both handgun and rifle. His reloads, particularly for 9mm, were in great demand during the height of the ammo shortage among family and friends. He donated hundreds of rounds to informal shooting sessions. He was quoted as saying “I do not sell my reloads but I sure will help my guys shoot ’em for free!”. He has a few cherished firearms that he has inherited or otherwise procured — those are his favorites.
He earned B.S. and M.S. degrees from Indiana State University in 1974-1975.
He’s a firearm experts and is the founder of mhardesty.com.