The best shooting range to zero a rifle scope for deer hunting and competitive shooting has long been a subject of debate. In most cases, the shooting range is between 100 yards and 200 yards. Have you ever fired an accurate shot with a scope that was sighted in at such ranges? The answer to this question would most likely be NO for beginner shooters.
On average, people who go deer hunting usually shoot their targets at around 150 yards. The target has to be shot quickly and while moving. You have to know how to set your scope properly if you want to hit your target every time. If the target is 6 inches in size or smaller, you will have difficulty sighting in at 100 yards or 200 yards. Because, while trying to shoot at this range, you might miss your shot (there won’t be an impact point on your target), and this would make it difficult for you to adjust the scope setting to hit the bull eyes.
What is the solution? Sight your rifle scope at a point-blank range. To sight, a scope at a point-blank range means to use as short a range as possible. A point-blank is very close such that you can hardly shoot a shot that would not appear on the target. Surprisingly, sighting at a point-blank range is quite useful for getting your scope ready for a longer range shot like 100 yards or more. In this article, you would learn how to set a rifle scope at 25 yards.
Tools
Before you head for the shooting range, you must ensure that you have the necessary tools, because having the right tools will make your job easier.
Screwdriver – Your riflescope has elevation and windage turrets. A turret is a capped circle with MOA measurement printed on it. The screw on the turret is usually flat-head, but it’s a good idea to double-check before leaving the house. The screwdriver would come in handy when you want to loosen or tighten different parts of the firearm.
Paper Target – You must have accumulated a sufficient quantity of paper targets during your range prep time. The best paper target to use is a white paper target with black grid lines that are clearly identifiable. The spacing on the grid should be a 1 inch spacing, and the bull eyes or target should be visible from 100 yards away. A 1 inch space grid would make it easier for you to determine the point of bullet impact. You could easily count the number of squares from the bullet hole to the bull eyes.
Marker- You would need a marker for keeping track of everything as you shoot at different distances.
Ammunition- When I started learning how to sight in my scope, I would just purchase a whole pack of ammunition and use all of it at the range. You won’t need to do this, just get enough ammo and you would learn how to maximize your shots. I now consider myself experienced enough to zero in on a target in fewer than 5 shots. It is always preferable to have excess ammunition and not use them than the opposite, but you can still be thrifty with your ammo.
Safety Gear- I’ve never gone to a range without my safety equipment. Some ranges sell this or have “loaners,” but you don’t want to risk getting some a scratched safety goggles. Since we are working hard to make our weapon as precise as possible, we need the best vision and safety gear to get the best shot possible.
How to Sight-in a Rifle Scope at 25 Yards
Let’s go to the shooting range now that you have all the tools. You no longer have to shoot with your iron sights because you are going to get a scoped rifle shortly. Follow these simple steps to set your rifle scope at 25 yards.
Step 1 Safety First
When you get to the shooting range, the first thing is to do a safety check on yourself and the rifle. Before pointing your rifle downrange, put on your protective gear. Also, whether you’re a beginning shooter or working with one, it’s a good idea to understand the rule of “Treat. Never. and Keep.”
Treat: Every weapon should be treated as though it were loaded, so don’t just get your hands carelessly on the trigger.
Never: Don’t point your gun barrel at anything you don’t plan to shoot.
Keep: Until you’re ready to shoot, keep the weapon safe and your finger straight.
Step 2 Hang Targets
After checking your safety gears, the next thing is to place your target at a distance of 25 yards from the shooting line. Look through the rifle scope to be sure that your field of view is clear and that the target is not slanted. If you’re working outside, the wind could be a huge problem, in that case, use a cardboard and staple to hold your target or wait till the wind is less.
Step 3 Fire
Aim approximately 1 inch higher than the target’s center. This is because of the ballistic path of the bullet. You will be able to make more precise shots at 100 yards range or more when you aim a little higher at the 25 yards target. With your aim point aligned, fire 3-5 shots. There isn’t much room for error, so take your time because each shot is significant.
Step 4 Evaluation
After shooting at that range, take your marker and target. Determine the center of your group shots (i.e bullet hole or bullet impact points) then count the squares on the vertical axis of the grid towards the center, and note the result. Do the same with the horizontal squares. Since you used a 1 inch grid, each square counted would be equal to an inch.
Step 5 Scope Adjustment
Next thing is to remove the caps or cover on the windage and elevation of the turret on your rifle scope. Your rifle scope should be 1 click = 1 inch on your paper target at 25 yards. Meaning at 50 yards, it would be 2 clicks = 1 inch, and at 100 yards 4 clicks = 1 inch.
Elevation adjustment– Turn the knob to adjust the elevation, the number of clicks you would turn is determined by the number of inches previously noted from the grid square count.
Windage- The same thing applies to windage. You have to count the number of grid squares from the bullet hole to the bull eyes horizontally. Remember, to adjust left, you must turn the windage to the right, and vice versa.
Step 6 Repeat
Return your target paper back to its position and fire 2-3 bullets an inch over the center once again. After firing, you would observe that your grouping has shifted, and if adjusted properly, the bullet impact should hit the exact spot you are aiming. Factors such as the bullet drop might affect your shot accuracy if you are shooting at a longer distance. So if you have not hit your target, follow the instructions in Steps 3, 4, and 5 again until you hit your target. You want your firearm and the scope to be striking the bull’s eye at every shot, not only “close enough”. Accuracy is essential, especially when hunting dangerous animals.
Formulas for Making Adjustments
The adjustment measurement is not the same for all rifle scopes. Some have ¼ inch MOA, as previously indicated, while others could have 1/8 inch or even ½ inch adjustments. These calculations will make it easier for you to zero your rifle scope at any range and will save you a lot of stress. If you correctly use these calculations, you should have no trouble as you zero in your rifle scope.
(Distance of the target in yards) / (100) = inches per MOA at that particular shooting distance.
MOA adjustment = (number of inch adjustment required) / (inches per MOA for that distance).
(# of clicks per 1 MOA) Multiply by (MOA adjustment) = scope adjustment in clicks.
Location
If you have had the pleasure of shooting at an indoor range that lacked enough lighting, then you would understand how important the location is. From experience, I can say that even if everything about your rifle scope is excellent, the range can still be a hindrance. If you want to zero your rifle scope outdoors, the wind is another factor that can affect your accuracy. Both indoor and outdoor sightings have their ups and downs. Fortunately, sighting your rifle scope at 25 yards is possible anywhere, whether indoor or outdoor.
Make sure the shooting range you want to go can support the range you want to shoot at, as well as give you enough room to position yourself properly for each shot. For excellent marksmanship, do not approach practice shots as you would in a real target situation. Try to take things slowly, as you improve on your shooting accuracy and performance, you can begin to try quick shots. During practice, slow equals smooth, and smooth equals accurate.
Why aim 1 inch above the target’s center?
After a shot, the projectile’s ballistic path will rise and fall. Aiming a little higher will help you to make more accurate and longer range shots.
If I zero at 25 yards can it give a 100 yards zero?
No. This is a widely held misconception on the internet. Sighting at 25 yards and firing at 100 yards will give around 2.7 inches of play which is usually insufficient to prevent you from hitting targets at 100 yards. In other words, You cannot hit a zero at 100 yards if you zero your rifle scope at 25 yards, however, there would be a few inches of deviation.
Why should I use a 25 yard zero?
You should zero in your rifle scope at 25 yards since it will allow you to make precise and point-blank shots. It is also easier to locate a shooting range that allows for sighting at 25 yards rather than 100 yards.
Mounting A Rifle Scope
The first step in zeroing a rifle is to have a correctly mounted scope with the scope rings firmly in place. Here is a guide If you do not know how to mount a rifle scope.
You can let a professional bore sight or mount your rifle scope if you don’t have the time. There’s no guilt in that— that’s what first-timers do.
So let’s talk about boresighting.
What exactly is a boresight?
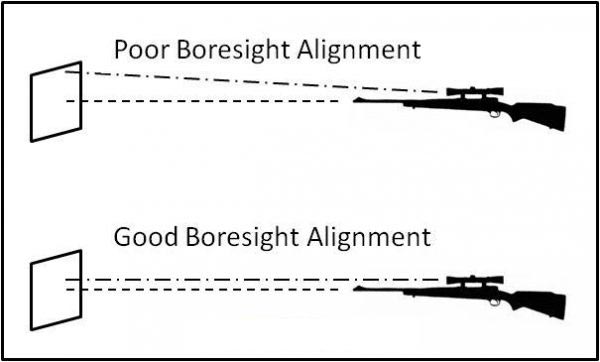
Boresighting involves using the bore axis of a rifle to sight a scope. If you have a gun vice and a rifle that allows you to remove the bolt and look through the bore axis of the barrel, then you could align a distant item on the barrel and then line the sight with that target. Lasers can also be used to aid in this process.
If you are new to shooting, it is advisable to hire an expert at the gun store to bore sight and mount your rifle scope rather than spending money on a laser that you would not use frequently. Bore sighting with a laser cannot get you fully zeroed at long ranges, but it’s an excellent starting point.
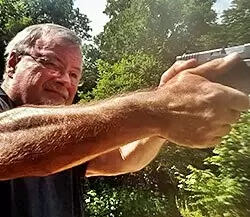
Mike Hardesty is a published freelance gun writer. He also possesses specialized expertise in rifle scopes With dozens of articles and reviews published in Pew Pew Tactical, Snipercountry.com, and TTAG (The Truth About Guns), Mike is considered a firearms expert. His special area of expertise is handguns.
Mike is a long-time shooter. He has been punching paper targets, taking deer and other game and shooting at competitions since about 1975. Other related pursuits include reloading and bullet casting. He currently reloads for over 10 calibers, both handgun and rifle. His reloads, particularly for 9mm, were in great demand during the height of the ammo shortage among family and friends. He donated hundreds of rounds to informal shooting sessions. He was quoted as saying “I do not sell my reloads but I sure will help my guys shoot ’em for free!”. He has a few cherished firearms that he has inherited or otherwise procured — those are his favorites.
He earned B.S. and M.S. degrees from Indiana State University in 1974-1975.
He’s a firearm experts and is the founder of mhardesty.com.