Have you ever wondered what goes on inside a rifle scope? A rifle scope is a sighting device made up of many parts and components, all working together for the same end result. This optical device has both external and internal components that ensure its functionality. In this article, we will look at the major components and systems that make up a rifle’s scope internal anatomy. Here’s what is going on in your scope!
How Does A Scope Work
A scope’s primary function is straightforward: it assists the shooter in aligning the barrel of a weapon with the target. However, the way a scope does this is a little more complicated. Although the external components have their own use, but the internal components are the most important aspect of a scope, and they help you to understand better how a high-tech optic functions.
A rifle scope’s interior works similarly to a telescope. There is a bigger objective lens at the front of the scope where light enters it, and an ocular lens at the back that focuses the transmitted light on the eye of the shooter. For the full length of a riflescope, you have the ocular lens, magnification lens, focus lens and objective lens.
Internal Anatomy of a Riflescope
A scope’s internal anatomy is a little bit complex, and it is divided into four main sections:
Objective lens assembly, focus lens assembly, erector lens assembly and Ocular lens assembly.
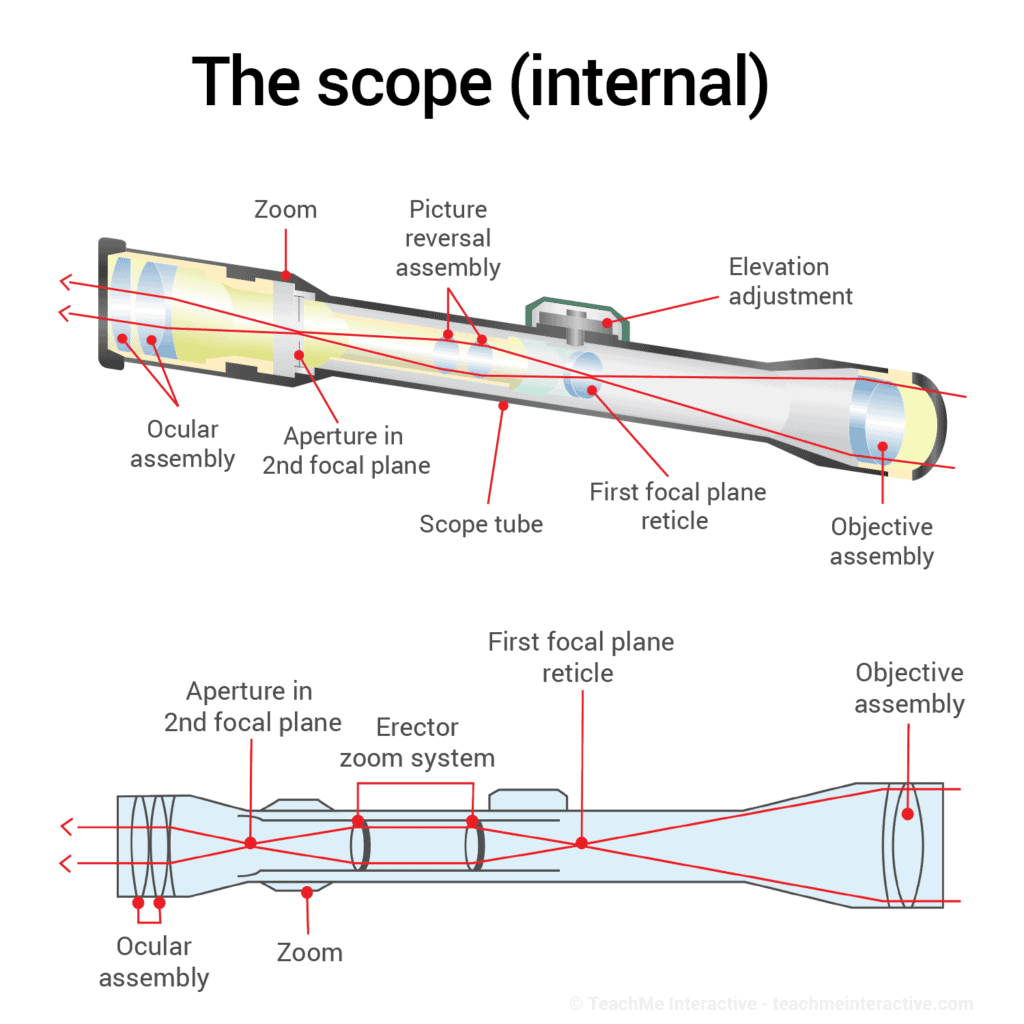
Objective Lens Assembly
If you look around, you will find out that all the lenses found in most of the contemporary rifle scopes currently available in the market are coated to prevent reflection or glare. The lesser the amount of light that is reflected by the lens of a scope, the higher the amount of light that will be transmitted to the eye of the shooter. Coated lenses can improve the light-collecting capabilities of your scope, thereby boosting your ability to use the scope in low-light shooting applications.
Why did we have to first mention lens coatings? We talked about lens coatings first because the objective lens of a scope is the most significant lens when it comes to light collection; the diameter and type of coating can make or mar the scope’s low-light capabilities.
The objective lens assembly is responsible for housing the objective lens in the tube of the scope. If your optics has an Adjustable objective, you may be able to compensate for parallax by tuning the adjustable objective and adjusting the location of the objective lens inside the tube.
Without the objective lens of the scope, there is no way that light will be able to get to the other lenses of the scope. Therefore, the shooter will not see any image. The objective lens of the scope can simply be termed the initiator of the light collection and transmission system in the scope.
Focus Lens Assembly
After the objective lens assembly, we have to travel backwards in the scope for us to get to the eyepiece and, finally, the shooter’s eye.
The next type of lens we will meet on our way to the shooter’s eye is the focus lens. The focus lens of a riflescope is housed in the focus lens assembly. These lenses can be adjustable or fixed.
The focus lens of a scope that is fixed is factory calibrated to be free of parallax in a particular range, most likely 100 yards. For riflescopes that come with a knob that can be used for parallax adjustment, this knob is rotated to compensate for parallax at different ranges. This compensation is done by moving the focus lens assembly further away or closer to the objective lens.
In reality, this implies that when the knob is adjusted towards infinity, the focus lens is moved closer to the scope’s objective lens. When correcting for nearer objects, the assembly is moved backwards in the direction of the ocular lens. In general, parallax-adjustable scopes may be dialed in to make it parallax-free at distances ranging from 50 yards to infinity.
Erector Assembly
The magnifying lenses and reticle components are held in the erector tube assembly. The erector tube is responsible for “erecting” the image, that is, generating an upright image. Let us find out more about this tube assembly.
*Magnification
Moving rearward in the scope tube along the ocular lens, we get to the erector tube. The erector lens assembly is responsible for housing the reticle and magnification lenses. When the power ring of a variable scope is turned, the lenses in the erector tube move closer or farther away from the objective lens of the scope.
What this means is that the erector lens is moved towards the objective lens when you want a higher magnification, and the erector lenses are moved closer to the ocular lens during lower magnification adjustment. In other words, when the magnifying ring of a variable scope is turned, the magnifying lenses in the erector tube are moved to change the magnification. When magnification is increased, the magnification lens advances closer to the objective lens. The lens travels closer to the ocular lens when the magnification is reduced.
*Reticle
The reticle can also be called “crosshairs.” Reticle can have a cell and this cell can be positioned on either side (front or back) of the magnifying lenses. This makes us have two different focal planes.
- First Focal Plane
A first focal plane reticle usually has its reticle on the front side of the lens. In this kind of setting, changing the scope’s magnification will cause the reticle to change size in relation to the shooter.In actuality, the reticle remains constant in size in reference to the target. The reticle keeps its relative size intact. If a target is 5 dots tall at lower magnification, it will still be 5 dots tall at higher magnification, implying that all holdover, range, and elevation calculations remain the same at all magnification settings.
- Second Focal Plane
A reticle that is on the second focal plane reticle can be found at the back of the magnifying lenses. The reticle retains its absolute size from the view of shooters and shrinks or expands in relation to the target whenever you modify the magnification.
The main limitation is that ballistics or range estimation is only valid at each magnification and must be recalculated after every magnification adjustment.
There are so many reticle types that can be used. Some are just simple crosshairs, meanwhile, others have up to three posts. Some contain a calibrated system of dots or hash markings along the hairs to help with the computation of holdover, range, and windage correction. They are called MIL-DOT reticles.
We also have illuminated and nonilluminated reticles. The illuminated reticles can further be divided into the red or green illuminations. Every shooter may have their preference when it comes to the illumination to choose from. The kind of reticle that is best for you will be determined by how you want to shoot your rifle. It will also be determined a lot by the lighting conditions you anticipate. There are no hard rules when it comes to choosing reticles. Just pick one that works for you.
*Windage and Elevation
The erector tube is also responsible for windage and elevation adjustment. How is this done?
The erector tube is pressed against the bottom parts of the elevation and windage screws by a spring mechanism to hold the tube in place. When the adjustment screws are pressed or turned inward, the erector tube is pushed against the spring system; when the screws are turned back, the tube is moved away from the spring system. This set-up helps to move the erector tube for elevation and windage compensation.
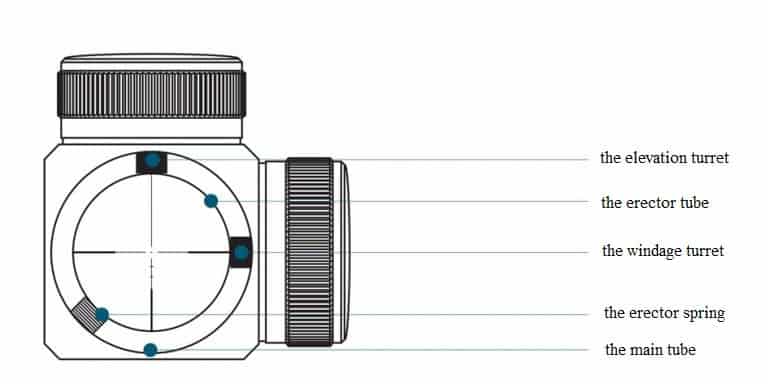
The erector tube serves as a connector point between the adjusting knob and reticle. The spindles and springs that run back to the knobs make contact here. The erector tube is moved when any adjustment is made.
The view through a scope can often be a surprise when adjusted for elevation or windage. The reticle will appear to move in the other direction. This is evident because the image sent to the erector is upside down. When windage or elevation is dialed in, the erector tube’s front is pushed down (the erector spring is compressed) while the rear pivots upwards, making the reticle look higher in relation to the target.
To re-acquire your target, the barrel must be angled downward; that’s where the elevation decrease comes from. When the height is increased, the exact reverse happens. Windage operates similarly to elevation but in the horizontal plane rather than vertical.
To acquire the entire range of adjustments, you must have a fully working erector spring. A cheap or old spring might impede operation.
Ocular Assembly
The ocular assembly is the final destination on our riflescope internal anatomy tour. This assembly comprise the scope’s eyepiece. Also, this is the part where the diopter can be changed, allowing shooters to focus the reticle by tweaking the location of the ocular lens. Take care not to over-adjust the ocular lens.
This adjustment’s sole purpose or aim is to focus or sharpen the reticle; do not attempt to focus the image with the diopter!
Optical Properties to Note
I’m going to take a break from anatomy to discuss some optical qualities that are significant in riflescopes. It becomes a little jargon at this point.
Magnification
Magnification, or power as some call it, is the first property to note. A scope’s magnification is simply how much the image is magnified. The image seen via a 4X power scope seems four times bigger than it would have appeared to the naked eye. This is indicated as a range in a variable scope, such as 4-12X. This means that the scope adjusts the image from 4 times bigger to 12 times bigger.
Scopes are frequently labelled by the diameter of their objective lens and magnification; thus, an optic labeled 3-12X50 has a 3-12x magnification and a 50mm objective lens.
Exit Pupil
The exit pupil is the next characteristic to consider. This is a computed parameter, not a measured one. Exit pupil diameter measures the size light beam that passes through the ocular lens and enters the shooter’s eye. This exit pupil diameter is derived by dividing the objective lens in mm by the magnification. As an example, a scope that has a 50mm objective lens and a 5X magnification will have a 10mm exit pupil.
The exit pupil diameter of a riflescope is more important in low-light situations, such as for dusk and dawn shooting. A scope with at least 5mm of exit pupil diameter is a good place to anchor because the pupil of your own eye is in that range.
Eye relief
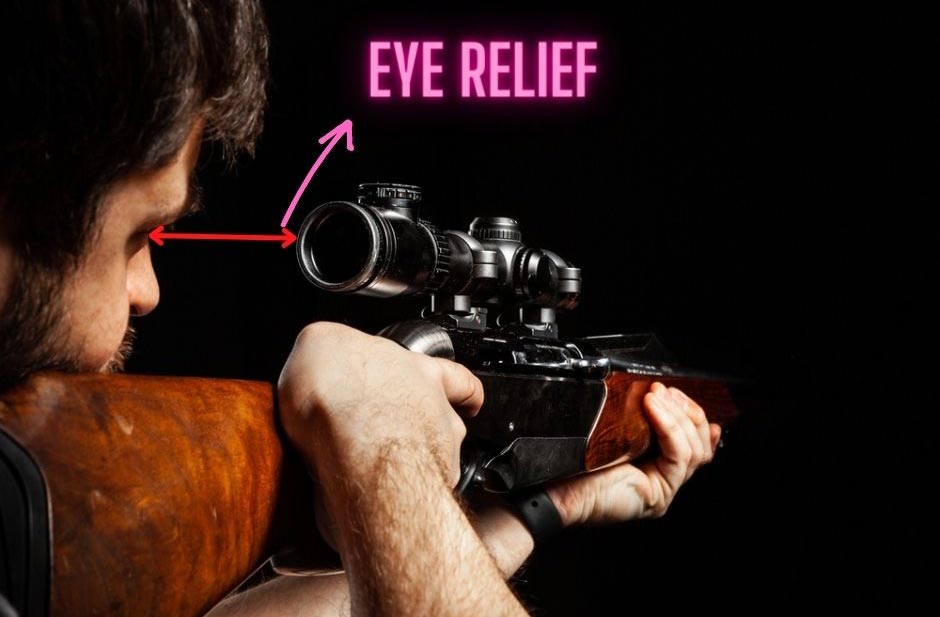
Eye relief is a measured parameter. It is the distance between the eye and the ocular lens required to see the exit pupil of the scope. The most crucial thing to remember while selecting a scope for eye relief is the recoil of the rifle.
If you have a high-powered rifle that delivers a great deal of punch after every shot, then you should not go for a scope with a smaller eye relief. Make sure your scope has ample eye relief so that you can keep your face safe. It is also noteworthy that when magnification goes up, eye relief will also increase. At greater magnifications, your eye must be closer to the scope to capture the whole view.
Field of View
Field of view is how wide you can see when you look through the scope. It is commonly described in terms of specific range; for instance, FOV is 40″ at 100 yards denotes that the image is 40 ft in width at 100 yards. In a variable scope, this amount is expressed as a range, and the FOV shrinks as the magnifying power increases. When monitoring moving targets, a broad FOV makes the target less likely to go out of your view.
Parallax
Parallax is observed when the reticle is not on the same plane as the target. Parallax error occurs when the reticle shifts its location or aimpoint on the object as the eye moves, which can affect accuracy in a negative way. There are scopes that have fixed focal points which are designed to be parallax-free at a certain distance, usually 100 yards.
Other riflescopes offer parallax compensation adjustments; this is done with an adjustable objective or a side focus knob. Parallax is reduced or eliminated depending on the locations of the focus lens and objective lens, as explained above. At the lowest magnifications, parallax issues rarely comes up, but it becomes an problem at higher magnifications.
Other scope terminologies
Coatings for Lenses
To accomplish precise outcomes, riflescope manufacturers use a variety of unique coatings for the surfaces of their lenses. Some lens coatings are intended to improve picture clarity. Lens coatings also minimize glare and thereby increase light transmission.
Another use of lens coating is to improve scratch resistance so that the lens is not damaged by rigorous handling.
Purging
Purging, which was formerly considered unique, is now considered industry standard. To prevent condensation and moisture from entering the scope, the manufacturer fills it with an inert gas like nitrogen or argon. This procedure keeps scope lenses from fogging, extending the scope’s effectiveness regardless of weather or ambient temperature.
Recoil
When choosing a sight for your rifle, be sure it’s rated for the amount of recoil your gun produces. A riflescope created for a 22-caliber rimfire round cannot withstand a centerfire round.
Scope Ring
A scope ring is not actually a rifle scope component but an essential part of riflescope mounting. Scope rings wrap the main tube at two points, fore and aft, and are used to mount the scope to the base mount or rifle.
Clearance
When you want to mount a sight, make sure the optic clears the bolt handle and the hammer. The bolt throw – the rotation of the bolt from open to closed — will also have an impact on the required scope clearance.
Scope Bite
The distance between the eyepiece and shooter’s eye is referred to as eye relief. A long eye relief is necessary for effective shooting, but it is also necessary for your safety. If you get too close to the eyepiece of your scope, the recoil may injure your eye. This injury is what is known as a scope bite.
What Is The Best Way To Clean The Internal Anatomy Of A Riflescope?
The answer is very simple: don’t do it. The interior parts of a rifle scope cannot be cleaned at all by the user. You can only clean the external surface of a lens when it becomes filthy using things like smooth cloth, lens brash, and so on.
If your scope has an internal fault or anything else is wrong with it, you should return it to the manufacturer. Because modern rifle scopes are usually sealed with inert gas, it’s a bad idea to try to open the internal parts.

Mike Hardesty is a published freelance gun writer. He also possesses specialized expertise in rifle scopes With dozens of articles and reviews published in Pew Pew Tactical, Snipercountry.com, and TTAG (The Truth About Guns), Mike is considered a firearms expert. His special area of expertise is handguns.
Mike is a long-time shooter. He has been punching paper targets, taking deer and other game and shooting at competitions since about 1975. Other related pursuits include reloading and bullet casting. He currently reloads for over 10 calibers, both handgun and rifle. His reloads, particularly for 9mm, were in great demand during the height of the ammo shortage among family and friends. He donated hundreds of rounds to informal shooting sessions. He was quoted as saying “I do not sell my reloads but I sure will help my guys shoot ’em for free!”. He has a few cherished firearms that he has inherited or otherwise procured — those are his favorites.
He earned B.S. and M.S. degrees from Indiana State University in 1974-1975.
He’s a firearm experts and is the founder of mhardesty.com.